


Category: Billing + Manage
The Billing & Manage category outlines the knowledge base articles and tutorials associated with common tasks and services for Liquid Web’s Billing and Manage interface located here: https://manage.liquidweb.com. From creating a user to paying your bill or configuring an API, explore all the resources the manage.liquidweb.com portal has to offer.
Using The One-Time Secret Tool In Manage
In order for one of our clients to start using the ‘one time secret’ tool within manage, you will need to login to the Manage portal to get started. Typically, passwords are not meant to be shared. Unfortunately, sometimes you will need to share a password or other sensitive data with the support admin you are working with. Regrettably, trying to pass along individuals character over the phone can be frustrating, annoying, and overly time consuming, and more so when a password is long and if the phone has a bad connection.
Creating an API User in Manage
Liquid Web’s Account Management System has a robust API that allows for accessing your account from outside the Manage interface. For example, the API can be used to integrate WHMCS directly to your Liquid Web account. To access the API, an API user must first be created for that account.
How to Login to the Cloud Sites control panel
For Cloud Sites customers, new and old, logging into your Cloud Sites control panel is likely one of the first things you’ll want to know how to do. Using the control panel you can leverage the power of the Cloud Sites platform in a simple-to-use interface.
How to Configure Cyberduck for Use with Storm Object Storage
Storm Object Storage delivers a durable, secure, highly available solution for storage needs of virtually any size. With object storage access occurs via API calls to the object storage cluster, which replaces the need to rely on additional servers for dedicated storage.
How to Login to Manage
The Manage interface is Liquid Web's Account and Cloud Management Portal. From Manage, it is possible to control all of your servers and services, whether your deployment is one Cloud VPS or a combination of many dedicated servers and other cloud services.
Adding IP Addresses to Your Server
Liquid Web allows additional IP addresses to be added to your server for a minimal fee. Having multiple IP addresses on your server can be useful when needing to differentiate domains hosted on your server. With multiple IPs you can set up advanced firewall configurations, use different hostnames with reverse DNS and more.
Updating Your Account Profile
You can easily update your account profile and communication preferences in your Liquid Web account. Just log into your Liquid Web account and navigate to the Account section and click on the Profile tab.
Exploring the CloudFlare Dashboard
II. How to Configure Your DNS for CloudFlare
III. How To Configure Your Server to Log Real Visitor IPs
IV. Exploring the CloudFlare Dashboard
How to Configure Your DNS for CloudFlare
II. How to Configure Your DNS for CloudFlare
III. How To Configure Your Server to Log Real Visitor IPs
IV. Exploring the CloudFlare Dashboard
Pre-Flight Check
- This article assumes that you have already set up CloudFlare and added your domain.
- We’ll be adding DNS records in Liquid Web’s Manage dashboard. If your site isn’t using Liquid Web’s nameservers, you’ll need to make changes at your registrar or DNS provider.
- We’ll be using cPanel to set up an .htaccess redirect. If you don’t have access to cPanel, you will need to edit your .htaccess file directly; if you’re using a web server other than Apache (such as Nginx or IIS), you’ll need to set up the redirect manually. You can find tips for doing so in the bonus content section of this article.
Step #1: Get Your CloudFlare DNS Settings
- Once your site has been added to CloudFlare via Manage, select Domains from the left menu, click on the CloudFlare tab and click the [+] button next to your domain name to expand the CloudFlare dashboard.
- Now click on the DNS Settings link near the bottom-right corner to view your settings.

- The popup window will show you the specific changes you’ll need to make for your site:
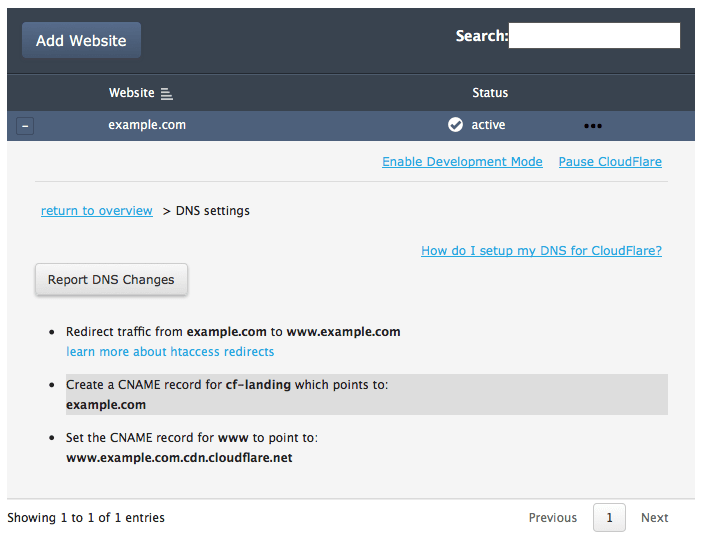 Specifically, you’ll need to:
- Add an .htaccess redirect to ensure all traffic to your site uses the “www” subdomain.
- Add a CNAME record for the subdomain “cf-landing.yourdomainname.com”.
- Change your CNAME record for the “www” subdomain to point to “www.yourdomain.com.cdn.cloudflare.net”.
Step #2: Redirect Traffic to Your ‘www’ Subdomain
If you have access to cPanel, setting up the redirect is a simple process using the method detailed below. If you don’t have access to cPanel, though, you’ll need to set up the redirect manually. You can find tips for doing so in the bonus content section of this article.
Billing and Payments Overview
In an effort to help our customers, we have recently made updates to the billing and payment sections of our Manage interface. With these changes, we hope to make reading and paying your Liquid Web bill a more streamlined and straightforward experience.
Our Sales and Support teams are available 24 hours by phone or e-mail to assist.